發表文章

[Java] try-with-resources 說明, 如何自動 close BufferedReader 等 IO 物件

每次用到 BufferReader , IO 等物件時候,通常都要寫 很多 try catch 去確保 物件有 close ,免得memory leak issue,像是以下程式碼 請看下面這個例子: package idv.jacky.ironman4; import java.io.BufferedReader; import java.io.FileReader; import java.io.IOException; public class Day20Example { public static void main (String[] args) throws IOException { BufferedReader br = null ; try { br = new BufferedReader( new FileReader( "c:\\temp.txt" )); String line; while ((line = br.readLine()) != null ) System.out.println(line); } catch (IOException e) { e.printStackTrace(); } finally { if (br != null ) br.close(); } } } 上面的例子,可以看到程式碼非常多的巢結構,可以改成以下的寫法 請看下面這個例子: package idv.jacky.ironman4; import java.io.BufferedReader; import java.io.FileReader; import java.io.IOException; public class Day20Example { public static void main (String[] args) throws IOException { try ( BufferedReader br = new BufferedReader( new FileReader( "c:\\temp.txt...

[Linux ] 常用指令

用關鍵字查詢執行的 ID ps -ef|grep [關鍵字]

Docker 常用指令

Docker 常用指令 Stop所有的 container docker stop $(docker ps -a -q) windows git Bash / Linux Only 刪除所有的 container docker rm $(docker ps -a -q) windows git Bash / Linux Only 刪除所有的 Images docker rmi $(docker images -a -q) windows git Bash / Linux Only 刪除container by name docker rm $( docker stop $(docker ps -a -q --filter ancestor=<container name>)) 刪除Image by name docker rmi --force $(docker images -q 'domi/sensor-raw-query' | uniq) 建置Image docker build -t {Tag名稱} . 上傳image到 docker hub docker push yourhubusername/imagename 下載 image 從 docker hub docker pull yourhubusername/imagename 執行docker docker run --name {自行命名} -d -p 8080:80 {images name} 進入container docker exec -it container_name /bin/sh 清除沒在使用的 Volume docker volume prune -f hackMD

[Gradle][Springboot] Gradle + SpringBoot multi-project + docker 如何設定

呼 ,太多版本 問題搞再一起,於是就搞了一天 網路上大多是 Gradle + SpringBoot multi-project  :   https://docs.gradle.org/current/userguide/multi_project_builds.html Gradle +SpringBoot docker :  https://spring.io/guides/gs/spring-boot-docker/ 的資料, 好我們要把上面說的在整合起來, 那其實就是要用最新的 gradle 設定 + spring boot 最新的設定 就沒問題了, 那我把範例專案就放在下面 , 直接看是最開快的啦 : https://github.com/kirinchen/gradle-multi-project-integration-springboot-and-docker-example

[Java] Eclipse / STS 如果執行時需要帶入參數,要如何設定

圖片
像是Java 的應用程式是可以代參數進入,但是如果有參數的Java程式透過 Eclipse IDE   這時候運行就會發生以下錯誤 Some examples below org.springframework.beans.factory.BeanDefinitionStoreException: Failed to parse configuration class [net.surfm.account.Application]; nested exception is java.lang.IllegalArgumentException: Could not resolve placeholder 'env' in value "classpath:${env}.properties" at org.springframework.context.annotation.ConfigurationClassParser.parse(ConfigurationClassParser.java:181) ~[spring-context-4.3.11.RELEASE.jar:4.3.11.RELEASE] at org.springframework.context.annotation.ConfigurationClassPostProcessor.processConfigBeanDefinitions(ConfigurationClassPostProcessor.java:308) ~[spring-context-4.3.11.RELEASE.jar:4.3.11.RELEASE] at org.springframework.context.annotation.ConfigurationClassPostProcessor.postProcessBeanDefinitionRegistry(ConfigurationClassPostProcessor.java:228) ~[spring-context-4.3.11.RELEASE.jar:4.3.11.RELEASE] at org.springframework.context.support.PostProcessorRegistrati...

[Gradle] 修復 java.lang.IllegalStateException: Could not find tools.jar. Please check that contains a valid JDK installation.

圖片
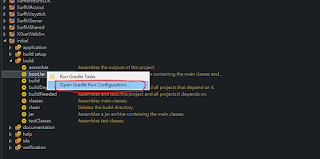
用 Gradle build 專案遇到  以下問題 java.lang.IllegalStateException: Could not find tools.jar. Please check that contains a valid JDK installation. 請到Task 按右鍵 然後選擇 Java Home 的位置 這樣就修復好了

[dApp] remix-ide v0.7.5 發生 remix connection from origin http://localhost:8080 rejected

很好這又是新版本的災情阿,主要是跟remixd的參數整合的問題 發現以下錯誤時 remix connection from origin http://localhost:8080 rejected 請去你的npm的路徑如下 [USER]\AppData\Roaming\npm\node_modules\remix-ide\bin 編輯 remix-ide 檔案 把以下幾行 server.listen(8080, '127.0.0.1', function () {}) var router = new remixd.Router(65520, remixd.services.sharedFolder, (webSocket) => {     remixd.services.sharedFolder.setWebSocket(webSocket)     remixd.services.sharedFolder.setupNotifications(folder)     remixd.services.sharedFolder.sharedFolder(folder)   }) router.start() 變成 server.listen(8080, '127.0.0.1', function () {}) 存檔 再啟動  remix-ide 啟動後再啟動 remixd -s <合約位置> --remix-ide http://127.0.0.1:8080 當然你必須自己先透過 npm 安裝  remixd